All CS 3x projects are STRICTLY solo. You may not collaborate with other students.
Setup
Register for the project using the registration tool and clone the repository as explained in the setup instructions.
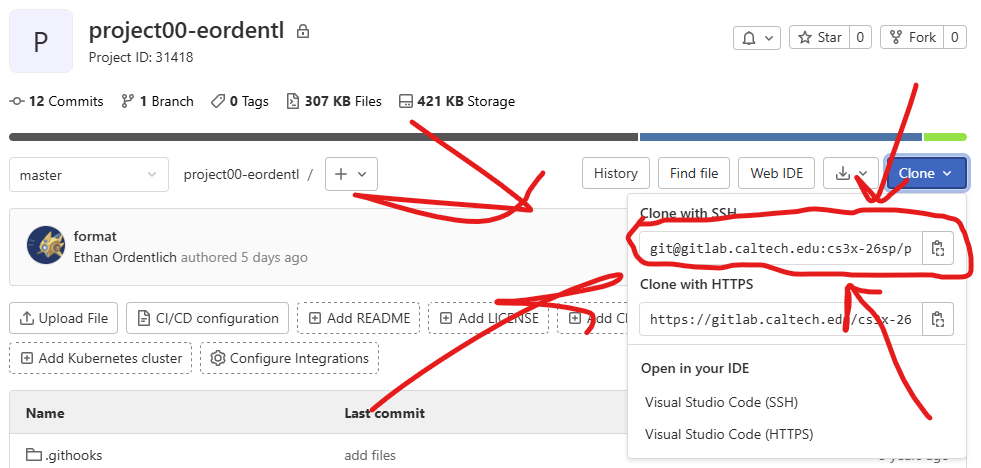
You MUST work solo on this project! You may not collaborate at all with anyone else! Please use the SSH link found at the picture after clicking the link in the registration email:
Introduction
For this project (and all future projects unless otherwise stated), all functions should be less than 50 lines or a significant number of points will be deducted.
When you open a URL in your browser, what exactly is happening? We will answer this question over the next few webserver projects as we attempt to “respond” to a browser’s request for a website.
URLs consist of three parts: (1) the protocol, (2) the remote server, and (3) the path. For example, the website you requested to read this document, https://sof.tware.design/25sp/projects/webserver/02, uses the “https” protocol, the “sof.tware.design” remote server, and the path “25sp/projects/webserver/02”.
While, nowadays, you will mostly see the “https” protocol, there’s others such as “http”, “file”, and “mailto”. The only difference between “https” and “http” is that “https” is secured using a certificate which your browser checks.
In practice, HTTP has been more or less phased out in favor of HTTPS for its security, but in this project we’ll be working with HTTP because it turns out that security makes things much more complicated.
After you complete this project, you’ll be able to run make server to start your own web server and connect to it from your own browser.
Hypertext Transfer Protocol (“HTTP”)
After you type a URL into your browser and hit enter, your browser constructs a “request” to the remote server specified in the URL.
HTTP requests are strings consisting of five parts:
- a “method,” which tells the server what you want from it (for now, we will only work with
GETrequests), - a “path,” which is the path from the URL and tells the server what resource you want to interact with,
- the version of the HTTP protocol being used (for now, we will only use
HTTP 1.1), - a list of “headers,” which are key-value pairs containing additional information about the request, and
- ”
\r\n\r\n” which terminates all HTTP requests.
What’s in a Web Server?
On the other side (the one being “requested from”) is a “web server”. A “web server” is a fancy name for a computer that is waiting (in a loop) for other computers to make requests using the HTTP(S) protocol. Since we know the format of an HTTP request, this more or less boils down to waiting and processing connections, one at a time. The general shell of a web server looks like the following:
- Until we feel like quitting…
- Wait for a connection
- Read bytes from the connection until we get “
\r\n\r\n” which indicates the end of an HTTP request - Parse the string into a struct for easy access to its pieces
- Decide on a response based on the request
- Format the response text as an HTTP Response
- Send the response over the connection
- Close the connection
Writing the Web Server
First things first, we need to port over your code from webserver01 and datastructures00.
We’re going to change the code you wrote in webserver01 to use a packed_strarray_t
instead of a strarray_t, so we’ve provided you with a script to copy over the files
and make some necessary changes.
Task 0a.
Make sure your previous code from webserver01 and datastructures00 is pushed to GitLab,
and then run ./update.sh. You should now see the files library/ll.c, library/mystr.c,
library/strarray.c, and library/packed_strarray.c in your project.
If running ./update.sh gives a ‘‘Permission denied`` error,
then try running chmod +x update.sh followed by ./update.sh.
This should update the permissions to allow you to run the file.
Now, we’re going to update the webserver code so that it uses a packed_strarray_t
instead of a strarray_t.
In webserver01, we wrote two functions that return a strarray_t:
mystr_split and ll_get_keys.
If you take a look at their function headers in the new project,
you’ll notice that we’ve changed them to return a packed_strarray_t now.
We will need to implement functionality that converts the original return value of strarray_t
to the new return value of packed_strarray_t.
To avoid code duplication, we are going to create the method packed_strarray_from_strarray
in packed_strarray.c, and then utilize it in the two updated methods.
Whenever we extend the functionality of a library like this, it is important to check for new edge cases
that may arise.
In our original implementation of packed_strarray_t, we never considered the creation of an array
with 0 elements, as that would lead to an empty data array.
However, now that we’re connecting our new packed array with mystr_split and ll_get_keys,
our packed_strarray_t should be able to handle being asked to create an array with 0 elements;
whenever we are asked to do so, we should return NULL to indicate that no data can be stored.
This also means some other details of our implementation will need to change…
Task 0b.
Implement the packed_strarray_from_strarray method in packed_strarray.c
using the header found in packed_strarray.h,
and update the mystr_split and ll_get_keys methods to match.
Then, update the packed_strarray_t implementation to handle the new edge case.
Once you’re done, run make task0 to ensure that your implementation is correct.
Next, let’s start sketching out the web server itself. It’s not going to do much yet, but you’ll be able to build on it. At any point, you can run make server to run your server.
There aren’t any tests for the server code until the end of this project, but you should test it yourself by connecting to it via the link printed by make server.
Task 0.5.
Implement the beginning of your server in server/web_server.c.
The rough idea of the server we’ll be implementing here is that, in an infinite loop, the server should
- wait for a connection
- read a string from the connection
- parse the string into an HTTP request
- decide on a response based on the request
- format the response text as an HTTP response
- send a string back along the connection
- close the connection
Each of these steps will be one or two functions.
For now though, you’re only doing the first two and the last one.
To wait for a connection, you’ll want to use the nu_wait_client function which takes a port and waits until someone tries to connect, at which point it returns a connection_t struct. Once you’re done with it, you should close this connection with nu_close_connection.
To read a string from the connection, you’ll want to use the nu_try_read_header function, which takes a connection and tries to read a string from it. It’ll wait for 100 microseconds before giving up.
If it gives up, it returns NULL. For now, just put it in a loop that keeps trying to read until it gets a value that isn’t NULL.
Since you haven’t written any parsing yet, you can’t do much more. Just write some code to print the request string and free it and then close the connection.
You can now run make server and connect to the URL this gives you. Your browser will say something like “this page isn’t working” because your server isn’t responding yet, but if you look in the terminal, you’ll see a request string.
Before you implement the parsing, we need to do some bookkeeping utilities.
For the next task and some of the later ones, you may find the strdup() function helpful. For
information on how and why we use it, scroll to the bottom of our reading on ownership.
Task 1.
Implement request_init and request_free in library/http_request.c. As usual, the details of these functions are in the documentation in include/http_request.h.
Once you’re done, you can run make task1.
The Format of an HTTP Request
An HTTP request will look like
[METHOD] [PATH] [VERSION STRING]\r\n
[KEY 1]: [VALUE 1]\r\n
[KEY 2]: [VALUE 2]\r\n
...
[KEY n]: [VALUE n]\r\n
\r\n
where each of [METHOD], [PATH], and [VERSION STRING] is guaranteed not to contain any spaces, \n, or \r, and each [KEY #] is guaranteed not to contain any :’s, \n, or \r. Each [VALUE #] is guaranteed not to contain any \n or \r (but may contain :’s).
The method, path, and version are space-separated and each line ends in \r\n. The key-value pairs are each on a separate line with the key and the value separated by “: ” (a colon followed by a space). The request header is terminated by a \r\n. The request may also include a body after the final \r\n, but you will not be parsing that in this project and may assume it doesn’t exist.
Parsing the HTTP Request
Now it’s time to implement the parsing.
Task 2.
Implement request_parse in http_request.c according to the HTTP spec given above and the documentation in http_request.h. If you followed the instructions in the info block above, you should have been able to print an example.
Once you’re done, you can run make task2.
Task 2.5. We’re now equipped to take another step along the server blueprint!
wait for a connectionread a string from the connection- parse the string into an HTTP request
- decide on a response based on the request
- format the response text as an HTTP response
- send a string back along the connection
close the connection
In server/web_server.c, simply pass the string you read before into request_parse to get a parsed request.
To verify visually that your parsing is working, you can print the version, path, and method from the request_t struct and try connecting to your server again.
At this point, your server is capable of parsing requests! Unfortunately, the server is not able to respond to them yet. We’ve done most of the work by writing the function response_type_format for you, but you need to finish it.
Responding to the HTTP Request
A response is formatted as follows:
[VERSION STRING] [RESPONSE CODE] [RESPONSE BRIEF]\r\n
[KEY 1]: [VALUE 1]\r\n
...
[KEY n]: [VALUE n]\r\n
\r\n
[BODY]
You’re only going to be supporting [VERSION STRING] = HTTP/1.1 and a single key-value header pair, Content-Type: text/html.
One of the primary components of the response is the “response status code” which represents a brief summary to the computer of the status of the response. This is things like “200” for “everything ok” or the ever-familiar “404” for “not found.”
The [response brief] is a short human-readable summary of the status code. For 200, this is "OK", or for 404 this is "Not Found".
See the documentation of the response_code_t type in include/http_response.h for details on what status codes you should support or see Mozilla’s documentation if you’re curious about other status codes.
response_code_t is an “enum” of status codes. Before you continue, you’ll want to familiarize yourself with enums by reading our explanation of enums and switch statements.
Now, go ahead and look at response_type_format. Since this function is mostly nothing new, we’ve done most of the work for you. However, you do need to fill out the status_brief function. You’ll want to use a switch statement.
Task 3.
Implement status_brief in http_response.c.
Run make task3 once you’re done.
Task 4. We can finish off your server checklist now.
wait for a connectionread a string from the connectionparse the string into an HTTP request- decide on a response based on the request
- format the response text as an HTTP response
- send a string back along the connection
close the connection
For the tests to pass, your server (server/web_server.c) must reply with "Hello, world!" when the request path is /hello. The tests for this week always pass /hello as the path, so you’re welcome to make it do whatever you want on other paths. The easiest way to complete this task is to simply respond with "Hello, world!" to all requests.
If you’re ignoring the contents of the request, the request can never fail, so format your string with response_type_format(HTTP_OK, MIME_HTML, body).
Since response_type_format takes in a byte_t *, you’ll need to use the bytes_init and bytes_free functions
defined in http_response.h.
Finally, you can send the response back to the browser with nu_send_bytes.
Remember that all these points should be in a loop so that you can connect multiple times.
If you run make server and connect, you should see your content appear in your browser!
Run make task4 to confirm that your server passes the tests.
Run make test to make sure you’ve finished everything.
For full credit, all the Gitlab tests must pass and make test must pass without
any errors. The server tests are unable to be run on Gitlab, so we will give credit for them
by manually running make test on your repo.
Push your code to GitLab to finish the project.